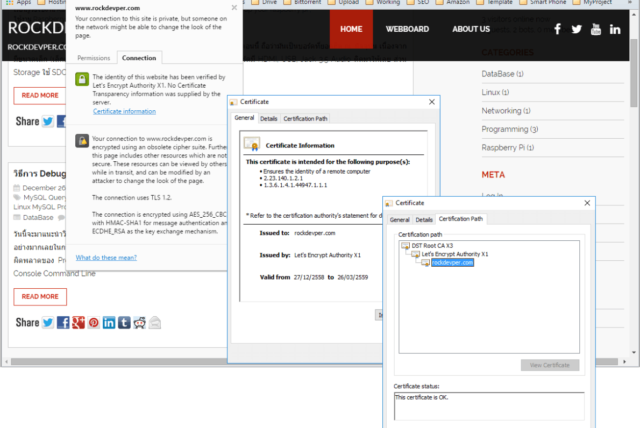
SSL (Secure Sockets Layer) เป็นเครื่องหมายรับรองความปลอดภัยทางอิเล็กทรอนิกส์ ที่จะบอกว่าเว็บนั้นมีความปลอดภัยและน่าเชื่อถือ จะเห็นได้ว่าทุกวันนี้ หลายๆ เว็บไชต์ใหญ่ๆ ต่างก็ใช้ SSL กันทั้งนั้น ไม่ว่าจะเป็น Google, Microsoft, Facebook, Twitter รวมถึงเว็บไชต์ที่ต้องการความน่าเชื่อถืออย่างพวกกลุ่มธนาคารทั้งหลายต่างก็ใช้ SSL เพื่อให้เกิดความปลอดภัยน่าเชื่อถือ โดยการรับรอง Certificate นั้นจะมีหน่วยงานที่รับผิดชอบด้านนี้เป็นผู้อนุมัติหรือเรียกว่า CA (Certificate Authority) ตอนนี้เห็นมีหลายเจ้าเหมือนกัน.
เจ้า SSL นั้น มันจะทำงานอยู่บน Protocol : HTTPS (Hypertext Transfer Protocol Secure) ทำให้การ รับ-ส่ง ข้อมูลระหว่าง Client – Server จะมีการเข้ารหัสข้อมูล (encryption) ซึ่งยากต่อการถอดระหัสและเข้าถึงเพื่อเปิดเผยข้อมูล ทำให้มีความปลอดภัยและเพิ่มความมั่นใจให้กับผู้ใช้มากยิ่งขึ้น และในปัจจุบันหลายๆ เว็บไซต์ทีรับรอง SSL/HTTPS นั้น จะต้องเสียค่าบริการหน่วยงานที่รับรอง CA ดังกล่าวด้วย จะว่าไปแล้วก็หลายตังค์เหมือนกันนะครับ ^ ^”

แต่ในบทความนี้ผมจะมาแนะนำ Let’s encrypt SSL ซึ่งเป็นฟรี Automate พัฒนาโดย Internet Security Research Group (ISRG). และขั้นตอนติดตั้งเพื่อใช้งานร่วมกับ Apache บน CentOS 7 กัน เพื่อให้เว็บไซต์ของเรามีความปลอดภัยและน่าเชื่อมากถือยิ่งขึ้น

มาเริ่มกันเลยยย !
ก่อนอื่นเลยให้ทำการติดตั้ง package/software เหล่านี้เข้าไปก่อนนะครับ (ในที่นี้เครืองผมมี Apache web server ติดตั้งไว้อยู่แล้ว) และเนืองจาก letsencrypt เขียนด้วย python ดังนั้น ต้องให้แน่ใจว่าเราได้มีการติดตั้งไว้ก่อนหน้านี้แล้ว
|
1 2 3 |
yum install git yum install epel-release yum install gcc libffi-devel python-devel openssl-devel mod_ssl |

ทำการ Download source code จาก GitHub
|
1 2 3 |
cd /root git clone https://github.com/letsencrypt/letsencrypt cd letsencrypt |
หลังจากที่เราได้ clone source code จาก Github ลงมาล่ะ ต่อมาให้เข้าไป directory ของ letsancrypt

จากนั้นรันคำสั่ง ./letsencrypt-auto เพื่อติดตั้ง software/package แบบ auto

ซึ่งมันจะทำการ install software ที่เกี่ยวข้องเข้าไปด้วย ซึ่งอาจจะใช้เวลา 2-5 นาที

หลังจากที่ install เสร็จแล้ว จากนั้นเราจะต้องทำการ Generate cert และ key เพื่อใช้ในการ config กับ Apache ในขึ้นตอนหลังจากนี้ โดยสามารถใช้คำสั่งด้านล่าง
|
1 2 3 |
./letsencrypt-auto certonly --standalone --email youremail@gmail.com -d yourdomain.com --agree-tos --text หรือ ./letsencrypt-auto auth -d yourdomain.com -d www.yourdomain.com --email youremail@gmail.com --text |

–email : ให้ใส่ email ที่จะใช้ในการ register
-d : ใส่ชื่อ domain
ผลที่ได้จาก command line ในการ generate certificate ด้านบนเราจะได้ cert file และ key ซึ่งจะเก็บอยู่ที่ /etc/letsencrypt/live/yourdomain.com จะมีทั้งหมด 4 ไฟล์

ตอนนี้ Apache มันยังไม่รู้จัก cert key ดังนั้นเราจะต้องทำการแก้ไขไฟล์ /etc/httpd/conf.d/ssl.conf โดยทำการเปลี่ยน path ที่อยู่ของ Cert & Key ทั้ง 3 อันให้ถูกต้อง
|
1 2 3 |
SSLCertificateFile /etc/letsencrypt/live/yourdomain.com/cert.pem SSLCertificateKeyFile /etc/letsencrypt/live/yourdomain.com/privkey1.pem SSLCertificateChainFile /etc/letsencrypt/live/yourdomain.com/chain1.pem |
|
1 2 3 4 5 6 7 8 9 10 11 12 13 14 15 16 17 18 19 20 21 22 23 24 25 26 27 28 29 30 31 32 33 |
# cat /etc/httpd/conf.d/ssl.conf | grep -v ^# <VirtualHost *:443> DocumentRoot "/var/www/html" ServerName yourdomain.com ErrorLog logs/ssl_error_log TransferLog logs/ssl_access_log LogLevel warn SSLEngine on SSLProtocol all -SSLv2 -SSLv3 SSLCipherSuite HIGH:MEDIUM:!aNULL:!MD5 SSLCertificateFile /etc/letsencrypt/live/yourdomain.com/cert.pem SSLCertificateKeyFile /etc/letsencrypt/live/yourdomain.com/privkey.pem SSLCertificateChainFile /etc/letsencrypt/live/yourdomain.com/chain.pem <Files ~ "\.(cgi|shtml|phtml|php3?)$"> SSLOptions +StdEnvVars </Files> <Directory "/var/www/cgi-bin"> SSLOptions +StdEnvVars </Directory> BrowserMatch "MSIE [2-5]" \ nokeepalive ssl-unclean-shutdown \ downgrade-1.0 force-response-1.0 CustomLog logs/ssl_request_log \ "%t %h %{SSL_PROTOCOL}x %{SSL_CIPHER}x \"%r\" %b" </VirtualHost> |
หลักจาก saved ssl.conf เสร็จแล้ว เพื่อให้ชัวส์ แนะนำว่าเราจะต้องทำการ restart apache ด้วย
โดยใช้คำสั่ง
|
1 2 3 |
# service httpd restart หรือ # systemctl reload httpd |

ถ้าอยากให้เวลาเปิดหน้าเว็บขึ้นมา แล้วบังคับให้มันทำการ Redirect ไปเป็น HTTPS/SSL โดยอัตโนมัติเลย ก็สามารถทำได้เช่นกัน โดยการแก้ไขไฟล์ .htacess
|
1 2 3 4 5 6 |
แก้ไข .htaccess ที่อยู่ใน /var/www/html/ <IfModule mod_rewrite.c> RewriteEngine On RewriteCond %{HTTPS} off RewriteRule (.*) https://%{HTTP_HOST}%{REQUEST_URI} [R,L] </IfModule> |
จากนั้นลองเข้าเว็บอีกรอบ แบบ http ธรรมดา จะเห็นว่าผลที่ได้มันจะ redirect เข้า https อัตโนมัติ https://www.rockdevper.com (SSL/HTTPS) ก็เป็นอันว่าเสร็จสมบูรณ์

ลองเข้าผ่าน มือถือ

เนื่องจาก Let’s encrypt SSL จะมีอายุให้เราใช้ฟรีแค่ 3 เดือน ถ้ามัน Expired หรือหมดอายุ ก็อาจจะต้องทำการ gen ใหม่ หรือ re-new อีกรอบ ดังนั้นเพือกันเหนียวเดียวลืม หรือไม่อยากเข้ามานั่ง re-new ทุกๆ 3 เดือน แนะนำว่าใช้วิธีตั้ง schedule cron job ให้มันทำการ re-new อัตโนมัติไปเลยจะดีกว่านะครับ
|
1 2 3 |
crontab -u root -e 00 05 01 * * /usr/local/letsencrypt/letsencrypt-auto certonly --webroot -w /var/www/html/ -d youdomain.com --renew-by-default && /bin/systemctl reload httpd |
กรณีถ้าอยาก renew แบบ manual ก็ทำได้เช่นกัน
|
1 2 3 4 5 6 7 8 9 10 11 12 13 14 15 16 17 18 19 20 21 |
# service httpd stop (For Apache) # service nginx stop (For Nginx) # ./letsencrypt-auto renew Updating letsencrypt and virtual environment dependencies...... Processing /etc/letsencrypt/renewal/youdomain.com.conf new certificate deployed without reload, fullchain is /etc/letsencrypt/live/youdomain.com/fullchain.pem The following certs are not due for renewal yet: Congratulations, all renewals succeeded. The following certs have been renewed: /etc/letsencrypt/live/youdomain.com/fullchain.pem (success) # service nginx restart (For Nginx) # service httpd restart (For Apache) หรือถ้าใช้ certbot ในการ re-new ก็สามารถทำได้เช่นกัน โดยเข้าไปเพิ่มที่ crontab ได้เลย sudo yum install certbot ติดตั้ง certbot จากนั้นแก้ไข crontab โดยใช้คำสั่ง sudo crontab -e 30 2 * * 1 /usr/bin/certbot renew >> /var/log/le-renew.log 35 2 * * 1 /usr/bin/systemctl reload nginx |
เพื่อให้ชัวส์ ทำการตรวจสอบ SSL อีกที ผ่านเว็บไซด์ SSLShopper
https://www.sslshopper.com/ssl-checker.html
https://www.ssllabs.com/ssltest/

Yeah !!! ในทีสุด.. ตอนนี้เว็บเราสามารถรองรับ HTTPS/SSL สะที เย้…
ถ้าใช้ Nginx อยู่สามารถติดตาม บทความด้านล่างได้เลยครับ
– วิธีเปิดใช้งาน PHP 7 บน Vesta CP เพื่อใช้งานร่วมกับ Nginx + PHP-FPM
– วิธีเปิดใช้งาน Nginx ให้รองรับ HTTP/2 บน CentOS 7
หวังว่าบทความนี้น่าจะเป็นประโยชน์กับท่านผู้อ่านไม่มากก็หน่อย และถ้าหากมีข้อผิดพลาดประการใด จึงขออภัยมา ณ ที่นี้ด้วยนะครับ
ขอบคุณครับ
Admin@rockdevper
Ref
https://letsencrypt.org/
https://digitz.org/blog/lets-encrypt-ssl-centos-7-setup/
http://qiita.com/hiropopjp/items/f32c097982702286f466
https://blog.apar.jp/linux/3619/
http://letsencrypt.readthedocs.org/en/latest/using.html#letsencrypt-auto


Comments are closed